
Tutorial - Creating a New Page Layout
In this tutorial we will make a simple puzzle page layout that can be used with puzzles that you create.
To start, open Word Search Construction Kit and click on Edit | Page Layout from the menu to open the Puzzle Page Layout window.
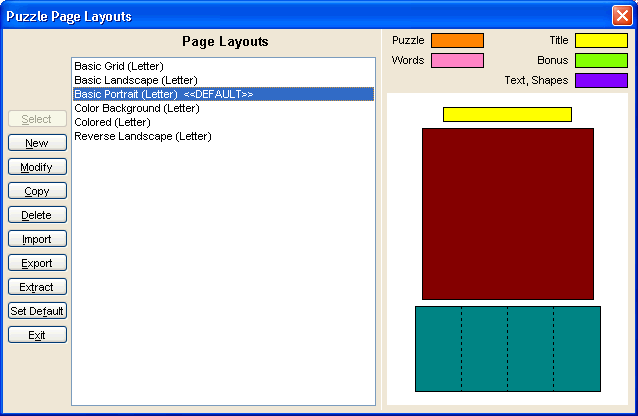
This window displays the layouts that have already been created. There are six layouts provided with the program. To create a new one, click on the New button to open the Page Creator window.
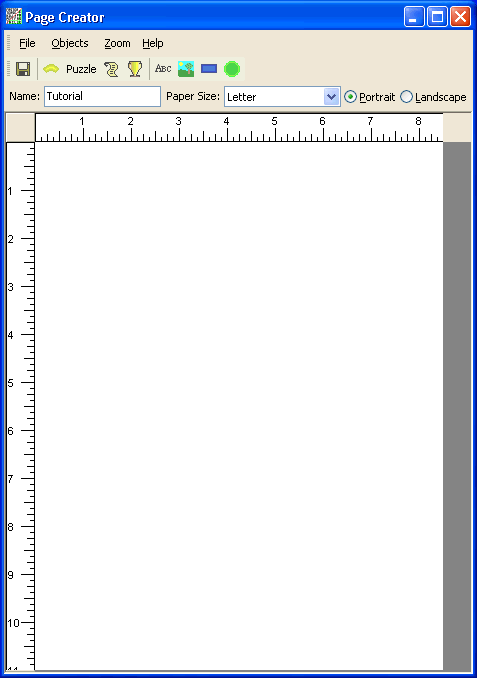
In the name field, enter the name of the layout we are designing. Enter the name Tutorial in this field. Next make sure the paper size is set to letter.
Title
Next we'll start designing the layout. Click
on the Title icon  and move your mouse to the layout grid
area and click. A yellow Title rectangle is inserted in the grid. Right
mouse click on the Title rectangle to open a menu. Left mouse click on
the Size and Position menu option to open the Size and Position window.
and move your mouse to the layout grid
area and click. A yellow Title rectangle is inserted in the grid. Right
mouse click on the Title rectangle to open a menu. Left mouse click on
the Size and Position menu option to open the Size and Position window.
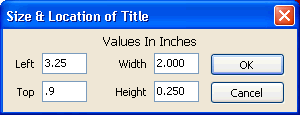
We'll edit the values to resize and reposition the title. In the Left field, enter 3.25. This leaves a 3.25 inch margin on the left. Enter .9 in the Top field to leave a margin of .9 inches at the top. Enter a width of 2.0 and a height of .25 to make the title box two inches wide and a quarter inch high. Click OK to save the changes. The Title rectangle will move to the coordinates we entered.
Puzzle
Click on the Puzzle icon and then click somewhere below the Title rectangle on the layout grid. A maroon colored puzzle block will appear in the layout. Right mouse click on the puzzle box to open the menu. Left click on Size and Position to open the Size and Position window
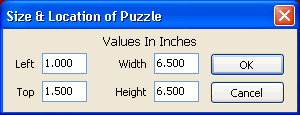
Now edit the values in this window. In this example we'll make a large puzzle area. In the Left field, enter 1.0. This leaves a 1.0 inch margin on the left. Enter 1.5 in the Top field to leave a margin of 1.5 inches at the top. Enter a width of 6.5 and a height of 6.5 to make the puzzle box 6.5 inches square. Click OK to save the changes. The Puzzle box will resize and move to the coordinates we entered.
Word List
Click on the Words/Clues icon  and then click somewhere below the puzzle box on the layout
grid. A teal colored Word List block will appear in the layout. Right
mouse click on the Word List box to open the menu. Left click on Size
and Position to open the Size and Position window
and then click somewhere below the puzzle box on the layout
grid. A teal colored Word List block will appear in the layout. Right
mouse click on the Word List box to open the menu. Left click on Size
and Position to open the Size and Position window
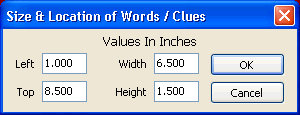
Now edit the values in this window. In this example we'll make a smaller word list area. In the Left field, enter 1.0. This leaves a 1.0 inch margin on the left. Enter 8.5 in the Top field to leave a margin of 8.5 inches at the top. Enter a width of 6.5 and a height of 1.5 to make the puzzle box 6.5 inches wide and 1.5 inches high. Click OK to save the changes. The Word List box will resize and move to the coordinates we entered.
Let's say we want to make four columns for the word list. To do this, right mouse click on the Word List block again. Then left mouse click on the Properties menu item.

Change the number of columns to four in the Properties window and click OK to save. The Page Creator window should look like the image below.
 .
.
Click on File | Save to save the new page layout. It is now saved in the list of page layouts in the Puzzle Page Layout window. It can now be used with any puzzles that you create.